
Adding a Custom Field to your account, so that you can import more data, is only going to enhance the ability of personalising your communications, where you can then Segment based on data and even personalise your comms within the Editor based on their Contact Cards. There are two ways to create Custom Fields in NewZapp.
The Contacts screen
In the Contacts screen click the settings cog in the top right corner and clicking Custom Fields.

This is where you can then manage the data fields known as 'Custom Fields' that you're looking at importing along with the standard fields like 'Email Address', 'First Name', 'Last Name' etc.

Once you've added one into this area, you must ensure that your import of contacts has the headers matching exactly what your custom field says.
Through a Contact Import
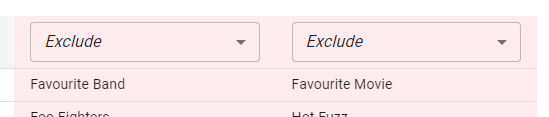
If you click the Exclude header there is an option for "New Field" and clicking this will open this screen.

Fill in this box and click Add Field and the columns will go white, with the new custom field at the top. From there you can import the contact file as you normally would.
Editing or Deleting Custom Fields
So now that you've created Custom Fields, what do you do if you want to delete them if they're no longer relevant? No problem at all. You just need to go back to the Custom Fields screen from the settings cog under Contacts.
This screen will show you all of the custom fields that you have set up and on the right hand side there are icons for editing and deleting your fields. Click the pencil if you want to rename or disable a custom field.

Alternatively, you can click on the dustbin icon to delete the custom field completely.

If you have any questions about Custom Fields, feel free to contact your account manager or send an email to support@newzapp.com